class: title <div class="scene f2 absolute top-0 left-0 w-10 bg-red bg-blue">6</div> <h1>Introduction to CSS</h1> <div class="conf-logo"></div> <div class="talk-meta"> <p class="talk-author">Garrick Aden-Buie & Silvia Canelón</p> <p class="talk-date"> <a href="https://presentable-user2021.netlify.app" class="underline f-lato" style="color: var(--text-light); text-underline-offset: 7px;">Professional, Polished, Presentable</a> </p> </div> --- class: center middle <img class="w-80 shadow-5" src="assets/img/06/ijeamaka_a-learn-css.png" alt="Tweet from @ijeamaka_a on April 17, 2021: 'lol I can't believe that a desire to customize shiny apps and my xaringan slides scammed me into finally getting a baseline knowledge of css + HTML.' 179 likes." /> .footnote[[.blue[@ijeamaka_a on April 17, 2021]](https://twitter.com/ijeamaka_a/status/1383504100470362116)] --- class: header_background f6 # Let's do this together! Restart your R session <kbd>Ctrl</kbd> + <kbd>Shift</kbd> + <kbd>F10</kbd> .mt4[ Open `06-intro-css/06-start.Rmd` ] --- name: remark-example class: f4 <pre><code style="color: #999">.pull-left⁠[ !⁠[cute lemur]⁠(lemur.jpg) ] .pull-right⁠[ Lemurs are the cutest. ] .footnote⁠[Duke Lemur Center] </code></pre> <script> const remarkExample = document.getElementById('slide-remark-example').querySelectorAll('.remark-code-line') ;[0,2].forEach(idx => remarkExample[idx].classList.add('red', 'b')) ;[4,6].forEach(idx => remarkExample[idx].classList.add('blue', 'b')) remarkExample[8].innerHTML = `<span class="orange b">.footnote⁠[</span>Duke Lemur Center<span class="orange b">⁠]</span>` </script> ??? You've probably encountered remark's dot-name-bracket notation before. The most common examples in the default slides are `.pull-left[]`, `.pull-right[]` and `.footnote[]`. We can use this syntax to modify the appearance or position of the text in our slides. And most importantly, we can create our own versions. --- class: header_background # Use .code[.big⁠[]] in the first slide 1. Launch `infinite_moon_reader()` 1. Put `.big[ ]` around just **a few words** on the slide <div class="countdown" id="timer_60e5bc3a" style="right:0;bottom:0;" data-warnwhen="0"> <code class="countdown-time"><span class="countdown-digits minutes">01</span><span class="countdown-digits colon">:</span><span class="countdown-digits seconds">00</span></code> </div> --- class: f5 <div class="mt4 pre-name">06-start.Rmd</div> ``` --- class: center middle Lemurs are the .big[most endangered] mammals on Earth  ``` ??? Your slide source code probably looks like this now --- class: center middle Lemurs are the .big[most endangered] mammals on Earth  -- name: rendered-example .footnote[ .ml1[Open the slides in your browser]] ??? Open the slides in Chrome or Firefox. Right click on the embiggened words and select _Inspect Element_ What rules are being applied to this element? Adjust `font-size` rule of the `.big` class --- class: header_background # Make the .code[.big] class your own 1. .b[Set the `color` to your favorite color.] Here are a few to try: - `DeepPink` - `CornFlowerBlue` - `RosyBrown` - `SeaGreen` 1. .b[Find another property to change.] Try typing `font-` and pressing <kbd>Tab</kbd> <div class="countdown" id="timer_60e5bb23" style="right:0;bottom:0;" data-warnwhen="0"> <code class="countdown-time"><span class="countdown-digits minutes">01</span><span class="countdown-digits colon">:</span><span class="countdown-digits seconds">00</span></code> </div> --- class: header_background # Copy the rule into your .code[extra.css] file 1. .b[Right Click] on [the rule](#rendered-example) and select .i[Copy Rule] 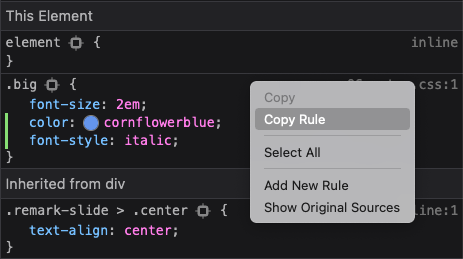 2. .b[Paste the rule into `extra.css`] and save to update --- class: header_background # Write your own rule 1. Follow the pattern from `.big` to write your own rule called `.fade` - Set `opacity` to `0.66` 1. Then, put `.fade[]` around the lemur image <div class="countdown" id="timer_60e5b950" style="top:3rem;right:0;" data-warnwhen="0"> <code class="countdown-time"><span class="countdown-digits minutes">02</span><span class="countdown-digits colon">:</span><span class="countdown-digits seconds">00</span></code> </div> -- .mb0[ <div class="pre-name">extra.css</div> ```css .fade { opacity: 0.66; } ``` ] <div class="mt0 pre-name">06-start.Rmd</div> ``` .fade[  ] ``` --- layout: true # Anatomy of a CSS rule --- .code.f4.mh-a.mt4[ .purple[selector] {<br> .ml4[.dark-green[property]: .blue[value];]<br> .ml4[.dark-green[property]: .blue[value];]<br> } ] --- class: animated fadeIn .code.f4.mh-a.mt4[ .purple[.big] {<br> .ml4[.dark-green[font-size]: .blue[2em];]<br> .ml4[.dark-green[color]: .blue[CornFlowerBlue];]<br> } ] --- layout: true class: f4 middle animated fadeIn <pre><code style="color: #999">.pull-right⁠[ Lemurs are .big⁠[the cutest]. ]</code></pre> --- Lemurs are the cutest --- name: inline-vs-block-inline Lemurs are .bg-washed-blue.blue.b--dashed.ph1[the cutest] <script> const exInline = document.getElementById('slide-inline-vs-block-inline').querySelectorAll('.remark-code-line') // ;[0,2].forEach(idx => exInline[idx].classList.add('red', 'b')) exInline[1].innerHTML = `Lemurs are <span class="blue b">.big⁠[</span><span class="blue">the cutest</span><span class="blue b">⁠]</span>` </script> ??? _Inline_ elements are like inline R code. They modify a small snippet of text --- name: inline-vs-block-block <div class="bg-washed-red red b--dashed p a1 mv3">Lemurs are the cutest</div> <script> const exBlock = document.getElementById('slide-inline-vs-block-block').querySelectorAll('.remark-code-line') ;[0,1,2].forEach(idx => exBlock[idx].classList.add('red', idx == 1 ? 'normal' : 'b')) </script> ??? _Block_ elements are like R code chunks. They're a whole chunk of _something_. --- layout: false class: middle .pull-left[ <pre><code style="color: #999">.pull-right⁠[ Lemurs are .big⁠[the cutest]. ]</code></pre> ] .pull-right[ Lemurs are .big[the cutest]. ] .footnote[ .ml1[Inspect the output]] ??? Let's see how xaringan and remark render the markdown on the left. --- class: middle animated fadeIn .pull-left[ ```html <div class="pull-right"> <p> Lemurs are <span class="big"> the cutest </span>. </p> </div> ``` ] .pull-right[ Lemurs are .big[the cutest]. ] ??? In the HTML we see the `.pull-right` is used for a `<div>` tag (block element) and the `.pull-left` is used for a `<span>` tag (inline element). --- class: header_background # Another place to put CSS (temporarily) The second slide contains a figure, using the `knitr::fig_chunk()` trick we learned earlier. With `infinite_moon_reader()` running... - Add a `<style>` tag to the slide markdown ``` <style> </style> ``` - In the next task, write you CSS inside the `<style>` tag. The slides will update live! --- class: header_background # Move the figure 1. Put the figure in a `.bottom-right[]`. 1. Create a new CSS rule in `extra.css` called `.bottom-right` 1. Set the `position` property to `absolute` 1. Set the `width` and `height` properties - Try values like `200px` or `450px` 1. Set the `bottom` and `right` properties to a CSS _distance_ - Try values like `1.5em` or `2em` 1. *Bonus* Give the plot a [border](https://developer.mozilla.org/en-US/docs/Web/CSS/border) <div class="countdown" id="timer_60e5ba83" style="right:0;bottom:0;" data-warnwhen="0"> <code class="countdown-time"><span class="countdown-digits minutes">03</span><span class="countdown-digits colon">:</span><span class="countdown-digits seconds">00</span></code> </div> --- class: middle <img class="absolute right-2 w-50 ba bw1 b--light-gray" src="assets/img/06/slide-bottom-right.png" alt="Slide result using the `.bottom-right` class" /> ```css .bottom-right { position: absolute; bottom: 1.5em; right: 2em; width: 450px; height: 200px; border: 2px solid gray; } ```